Make your projects look stunning and impress your visitors with React and GSAP.

Being a front-end web developer, something I do regularly every day is keeping up with new trends, and what better place than Awwwards to not miss a thing?
If you have never visited awwwards.com, I strongly suggest you check it out right now, a 🌍 world will open up to you!
That being said, it is indisputable that sophisticated animations are definitely a trend and GreenSock (GSAP for friends) is the tool that allows you to create them with disarming simplicity.
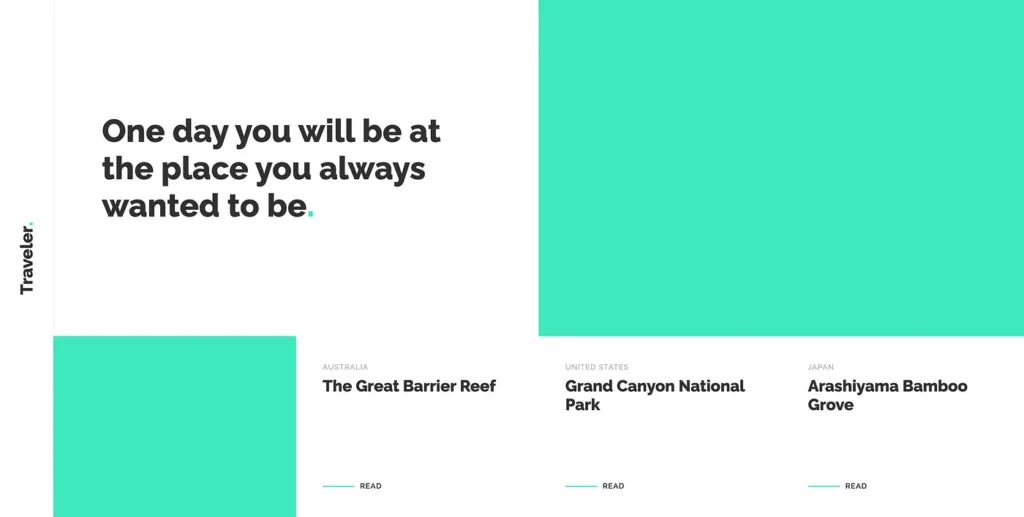
In this article, I’ll walk you through the basics of integrating GSAP into your React application by creating a homepage for a travel blog. Here’s a preview of what we’re going to build:
Let’s get into it, shall we? 💪🏼
Set up the project
If you want to follow along, you can download the starter files, otherwise, feel free to experiment with your code.
I’m assuming you have a basic knowledge of React and GSAP, if you haven’t these are some great guides to get started:
- Intro to React from the React team
- Learning Center on GSAP website
Once you have downloaded the project and extracted the zip, open the project in your code editor. First of all, install the packages with yarn, by running yarn in the terminal.
Now that all packages are installed, run yarn start in the terminal to start the React development server and in your browser, you should see this:
In the starter files, you’ll find a basic React project, nothing too fancy.
Let’s go quickly through the folder structure and what the scope of the main files is:
- in
src/App.jsthere is some JSX for our layout, - in
src/styles/app.scssall the necessary styles are contained, src/json/articles.jscontains a constant with an array of objects for some dummy articles, imported and rendered in src/App.js,src/utils/animations.jsandsrc/utils/helpers.jsare empty, we are going to need them later.
Great, we are ready to move on with the 🧃 juicy part of this article!
Save DOM nodes in constants with useRef hook
On the homepage, we are going to animate the title, the quote, both images, and the articles’ cards.
To do this, we must first save the DOM nodes of each element in a constant: this is possible thanks to the useRef hook that returns a mutable ref object whose .current property is initialized to the passed argument (initialValue). The returned object will persist for the full lifetime of the component.
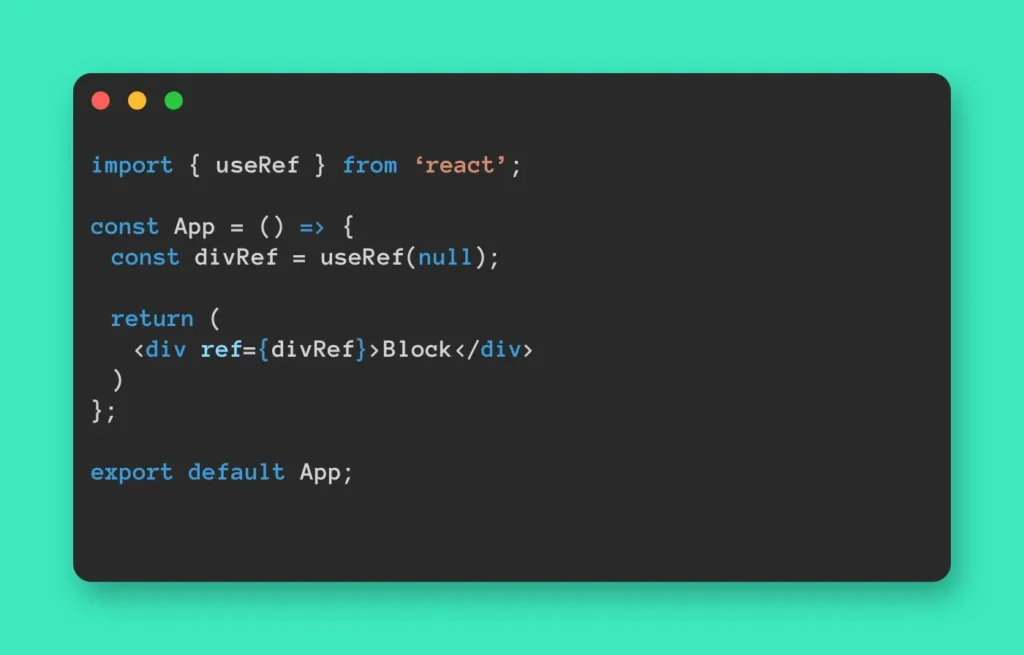
1. Import the useRef hook
Open App.js and at the top of the file import the useRef hook:
import { useRef } from 'react';
2. Create the constants
In the App function, create a constant for each of the elements that will be animated and set the value of all of them to useRef with initialValue set to null:
Articles’ cards need special attention because the value of .current property has to be an array.
This can easily be achieved by setting .current to an empty array [], further on I’ll show you how to add the DOM nodes to the just created array.
const articlesRef = useRef(null);
articlesRef.current = [];
3. Pass the ref tag object to React
To pass the ref tag object to React use <div ref={myRef}> so that the .current property will correspond to the DOM node whenever that node changes.
Instead for the list of articles, create a reusable function that helps to add the DOM nodes to the array. Open helpers.js and past the following code:
In App.js import the function that you just created.
It expects as arguments a DOM node and the ref constant and should be called in the mapping of the articles array, as follows:
Time to bring in some motion
The following steps are going to make the website come to life. 🌺
1. Create the Tweens
In animations.js create a Tween or Timeline for every block, feel free to customize them to your liking.
Remember to import GSAP into the document. 😉
import gsap from 'gsap';
Creating a ref for every element we want to animate can add a lot of noise to our code, this can be avoided by making use of GSAP’s selector utility gsap.utils.selector to easily select descendant elements as I did in the ImageAnimation.
Our animations are ready to rock! 🎉
2. It’s useEffectLayout‘s turn
In App.js import the useEffectLayout hook, also the animations you just created, and don’t forget to import GSAP that you’ll use to create a final Timeline to handle the timing of all the single animations.
import { useRef, useLayoutEffect } from 'react';
import { articlesAnimation, h1Animation, h2Animation, imageAnimation } from './utils/animations';
import gsap from 'gsap';
Finally, init the animation:
…And that’s it! 🏆
Conclusion
GSAP and React will make your projects look stunning and impress your visitors! ✨
I truly hope this article helps you get started with GSAP and React.
This is just a beginner guide, If you have any doubts or questions, feel free to leave a comment and let me know if you want to read more advanced content about these two technologies.
Useful links
- GitHub repository: https://github.com/GiuliaMalaroda/GreenSock-GSAP-in-React
- Live version: https://gsap-in-react.vercel.app/
Leave a Reply